Saturday 14 December 2013

made by lolly SALE NOW ON!

http://madebylolly.co.uk/ourshop/

In case it wasn't clear....

the made by lolly end of season sale is now on!

A large number of my felt flower brooches have 25% off their previous selling prices

It's the perfect opportunity to finish off your Christmas shopping...
most of the reduced items come in under £10 so are perfect for Secret Santa or Stocking Filler Gifts!

OR - Why not treat yourself?

Many of the colours and designs in this Collection will be retired in January
This may be your last chance to buy one of your favourites!

Tuesday 12 November 2013

Win Free Tickets to the Country Living Christmas Fair in Harrogate!

Did you know... 

that I am going to be appearing at this year's Country Living Christmas Fair taking place in Harrogate?


From Thursday 28th November until Sunday 1st December, you will be able to find made by lolly in Hall C of the Harrogate International Centre on Stand F34A. And that's not all...

I have 5 pairs of FREE tickets to give away!

If you would like to win one of five pairs of tickets to get into the show for FREE on either Thursday, Friday or Sunday (unfortunately these free tickets are not valid on Saturday) then follow the instructions below:
  1. Pop over to my website - www.madebylolly.co.uk
  2. Have a lovely look round
  3. Come back here and post a comment telling me which item you are most looking forward to seeing at the fair
And that's it!

The competition is only open until Wednesday 20th November 2013 at 9pm, so make sure you get your entry in quick! Feel free to share this competition with your friends - but note that the only way to enter is by leaving a comment on this blog post. Only one entry per person.

Please make sure you have read the full T&C's at the bottom of this post before entering

Best of Luck!

Laura x

EDIT 20/11/2013: The draw has now taken place!

I used a sequence generator from Random.org and the first 5 numbers out of the hat were 13, 2, 3, 11 and 5 
 
This means that the winners are John, Kiki's Umbrella, The Handkerchief Tree, Marilyne b and Jah
 
Please email me at madebylolly@hotmail.com with you postal address so that I can send out your tickets!
 
 
See you in Harrogate x


Terms and Conditions:
  1. To enter, leave a comment on this post telling me which made by lolly item you are most looking forward to seeing at the Country Living Christmas Fair
  2. Only one entry per person. Multiple comments will be deleted, and only the first comment accepted.
  3. Feedback is welcome at any time, but only comments received between now and 9pm on Wednesday 20th November 2013 will be accepted for the prize draw
  4. Each comment will be assigned a number, and a random number generator will be used to pick the 5 winners
  5. I reserve the right to delete comments and exclude from the prize draw any persons that leave comments that are excessively rude or contain spam content
  6. The winner will be announced via this blog during the evening of Wednesday 20th November 2013, and the prize of one pair of tickets to the Country Living Show Harrogate will be posted free of charge to each of  the winners within 2 days of receiving confirmed address details.
  7. After the draw has taken place, it is the winners' responsibility to email me at madebylolly@hotmail.com with their address details. If the winners have not claimed their prize by Tuesday 27th November at 9pm, I reserve the right to withdraw the prize

Saturday 3 August 2013

Jamsmith - From one Smith to another

This morning I was rudely awoken from my Saturday morning snooze by the postman.
But today I didn't mind this interruption to my beauty sleep.

Firstly... I was meant to be up anyway.
Secondly... I knew the reason why Mr Postie was rat-a-tat-tat-ing on my door.

I had a parcel. And not just any parcel. 

It was a brown paper parcel tied up with string... containing JAM!

It was sent from my twitter chum Vicky
(who just happens to also live in Yorkshire and have the same surname as me.)

From one Smith to another....

But as well as living in Yorkshire and having a great surname, Vicky runs JAMSMITH
 which, in her own words, is....

"a handmade, quality, seasonal preserves business based in the Yorkshire Dales. 
It's a foodie treat or gift by post. I make and send two small-batch, unique flavoured jams, jellies, marmalades or fruit butter every month via a one or three monthly subscription"

This month Vicky appeared in Country Living Magazine (September 2013 p58) 
in the Kitchen Table Talent section describing how she has grown her business over the last 18 months. I loved the article, and thanks to the gorgeous pictures I now covet not only her jam, but also  her house, her dog and her wardrobe!

I am very lucky that Vicky has sent me a sample of her latest seasonal flavour combination to try - 
Yorkshire Raspberry and Wild Spearmint

This is Jam, Jim - but not as we know it!

The flavour is truly scrumptious - and the addition of the spearmint in this particular flavour combination is sublime - adding a delicious, subtle, sweet undercurrent which lingers long after you have finished your toast!

But make sure you savour every mouthful...
You won't come across this jam anywhere else, as it is exclusive to members of the subscription club. Each month Vicky creates entirely new flavour combinations - and no flavour is ever repeated. (Shame - because I love the sound of Lemon, Pear and Ginger!)

I really cannot wait till breakfast tomorrow to have some more.

If you want to find out more about JAMSMITH, head over to 
the website: JAMSMITH.CO.UK
to twitter: @jamsmithclub
to facebook: /jamsmithclub 


 ...NOPE. Can't do it. 
I really cannot wait until breakfast time.
That jam is delicious.
I'm off to make some more toast!

Wednesday 31 July 2013

#IndieMonth - What I've done to support #IndieRetail

Purchases from Delicious, JilMadeThis and Bevolee
You may or may not know, but July has been #IndieMonth where consumers have been urged to change their habits and show their support for local independent retailers.

Being a small independent retailer myself, I could hardly ignore this campaign! 

And although I do try to buy from #IndieRetail whenever I can, this month I have tried a little bit harder, and I thought I would share with you some of what I have been doing to support #IndieMonth!


My very first purchase of the month was a steak pie from Billy's Hill Farm Shop in Hemingfield. Unfortunately this item doesn't have a photo as it was eaten before we had chance to photograph it! 
I can heartily recommend their pies, and award winning sausages! 
They also sell a great selection of cheese, wine, meat and handmade bread.

My second purchase of the month was from Folksy shop Delicious.
Based in Leeds, Elizabeth sells hand screen printed posters and cards, and it was some of her beautifully intricate cards that I treated myself to:

Blue Screenprinted Folk Tree Card by Delicious

 My next purchases all came from the craft fair at Elsecar Heritage Centre organised by Paperdoll Events. Both makers were people that I had admired on twitter, so it was so great to meet them in person and help support their wonderful work!


From JilMadeThis I bought 'Howard'
He is the spitting image of my friend George and I couldn't leave without purchasing this item as a gift! But nor could I leave without something for me too...
So I treated myself to the little floral postbox brooch shown in the photo at the top of the page.

'Howard' aka the spitting image of our friend George!

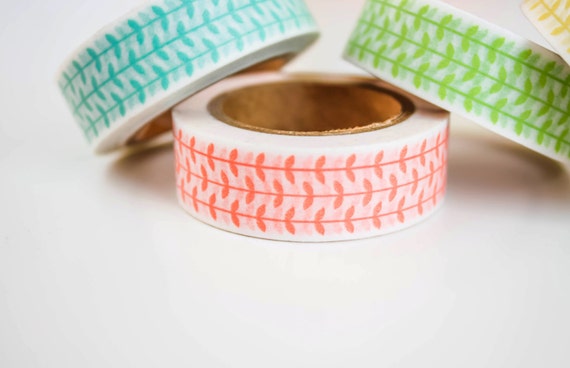
As I was leaving I spotted Bevolee from Little Paper Spaceship whose beautiful designed washi tape I have admired for a long time. So out came the purse, and another purchase was made!

Washi Tape designed by Bevolee

During this month I have also pledged to support a Kickstarter campaign for the first time!
Local illustrator Jen Whitman is looking for pledges to put toward her dream of getting her designs printed onto calendars and wallplanners. At the time of writing her campaign had 14 hours to go and was disappointingly short of her target. This is a fab project, and by pledging just £5 (or more) you will receive one (or more!) of her lovely calendars.


 So that's what I have been doing to support #IndieRetail during #IndieMonth
Please feel free to leave a link in the comments to share what you have purchased during July!


But before I go, I want to say a big thank you to everyone who buys handmade,
supports local shops, and seeks out independent retailers.
Keep up the good work!
I also want to give a big shout out to my real-world stockists, who do so much to
help support handmade art, craft and design.

Thank you!

Artworks in Beeston, Nottingham


 The Gift Gallery in York

Saturday 13 July 2013

Craft Stall Display - How made by lolly has changed over the years

Every time I attend a craft fair or event with made by lolly I do my best to come up with the most amazing stall design that I can. It's not always easy, and I look back at some of my early attempts and cringe!

But... over the years, as my stall display skills have increased, and I have collected a better variety of display equipment the more pleased I have been with the finished design.

However, since I found my 'muse' (You can read all about that in the post 'How I inadvertently invented a marketing strategy...')  I have a much better understanding of my style and what types of craft stall display work best with the felt brooches and corsages that I now make.

So... as I am now on Summer break and won't be attending any craft fairs for a couple of months (don't worry you can still shop online!) I thought it would be good fun to have a look back at some of my previous craft stalls and see how my style and skills have (hopefully!) developed and improved over the years.

Promise you won't laugh... 

Here in all its technicolour glory is a picture of my first ever craft stall.
Taken at Elsecar Heritage Centre on 22nd May 2010:

Look how few brooches I have on my stall back in May 2010...
Next we move on to the rest of 2010 and early 2011.
Purple is still a very big feature. But already you can see lots more brooches!


Unfortunately I cannot seem to locate any pictures for Autumn/Winter 2011 
or Spring/Summer 2012 so we will just have to fast forward directly to 
Autumn/Winter 2012.

The purple tablecloth and mismatched equipment have gone into hibernation 
to be replaced by pale cream and grey wooden crates and baskets.
Felt brooches as far as the eye can see!


By Spring/Summer 2013 I have swapped to a grey tablecloth and am using the wooden crates 
to create a stepped display area for my luxury boxed corsages. 
I acquire hessian lined wire baskets and a make a hessian tablerunner to match.


...And hey presto! 3 years and 3 tablecloths later a stall display to be proud of:


Featuring a LOT of felt flower brooches!

I'd love to know what you think of the changes that I have made to my craft stall display 
over the last few years. Is there anything that you particularly liked or disliked?

Have you got any favourite tips for making your stall look fabulous?

Also...
Do you have any suggestions for changes that I could make in the future?
From September I have a lot of big events that I will be attending where I really want to make an impression and stand out from the crowd.

What else could I do to make sure that made by lolly felt brooches get noticed?

Please feel free to leave any feedback in the comments below!

Wednesday 12 June 2013

Patchings Art Festival 2013 - during the event

Slightly later than promised... 
...but better late than never, here are some pictures of my stall set-up during 
Patchings Art Festival 2013!

As you can probably tell from the 'before' photos (see my previous blog post!) 
you are given a very generous pitch in which to set up your stall. 
In the end, I think I ended up with a spot approximately 8ft x 10ft - which could have seemed 
quite daunting, given the small size of things that I sell...


However, I had agreed to demonstrate while I was there, and having my second work table 
and all my equipment certainly helped to fill up the space nicely!


I had also decided that I wanted to offer customers the opportunity to have a go at 
designing their own customised take-away felt brooch kit.


 This pic 'n' mix approach was a hit with the customers...
 and if you include pre-made as well as take-away, then kits were the definite best seller! 

I am hoping to be able to refine this idea so that I am able to offer this service at all future craft fairs, but in the meantime, if you are desperate to have a go at some DIY crafting, you can still


Wednesday 5 June 2013

Patchings Art Festival 2013 - before the event!

Packing for a craft fair can be difficult at the best of times - but what happens when the fair is four days long... and you're demonstrating too?

Well this weekend I will be taking made by lolly folded felt accessories to their first four day event, so I guess I'm about to find out!

I'll be exhibiting, and demonstrating in the craft tent at Patchings Art Festival in Calverton (near Nottingham) between 6th - 9th June 2013. As it's my first event of this length, I thought it might be fun to share some behind-the-scenes photos of my planning and preparation!

Packing the car. The impossible task...
Apparently, it turns out that you CAN fit the entire contents of my workroom, all my stock 
and some extra display equipment into a very small car and safely make it over the border 
from South Yorkshire into Nottinghamshire!

Made it! All unpacked at Patchings
Putting the tables together...
Tablecloth on, bunting up. We're slowly getting there!
Almost there...
A sneak peek at my 'make-your-own' brooch kit bar
I can't wait to see what it looks like once all the stock is out on show!

I do hope you'll pop back tomorrow to see the photos of the finished stall display...

...until then, 
goodbye!

Laura x

Monday 27 May 2013

And the winner of the Poppy Galore Giveaway is....

....Comment Number 6


Congratulations to jkt 1965 for being the lucky winner!

It looks like you will be adding something else from made by lolly to your growing collection!

I shall be in touch to arrange delivery of your prize.


Many thanks to everyone who took part, and for your amazing feedback. I wish you all could have been winners! It's lovely to know you support the idea of making the Poppy Red Collection available all year round, and approve of my new badges :-)

And thank you too for the fabulous suggestion of making a Felt Poppy Hairband...
I will get to work and let you all know when they are ready for sale!

Thank you all for your support.
Laura x


Friday 24 May 2013

Poppies Galore! and a free prize draw

 made by lolly red felt poppies are back for good!


Due to popular demand, I have decided to make both the traditional red felt poppy corsage AND 
the red felt retro style poppy corsage available all year round!

And in addition, I have created some poppy collectibles too!


Available to buy from my online shop, the 'Poppy Red' collection currently includes: 


I'd love to know what you think of the new items - and would also appreciate 
your suggestions as to any new poppy products that you'd like to see in the future...

So, as a little thank you, every person that takes the time to leave a comment offering feedback relating to the made by lolly 'Poppy Red' Collection will be entered into a free prize draw to win a Poppy Card with Badge (to giveaway to a friend) and a Poppy Badge (to keep for yourself!)

Please just check out the T&C's below before entering!

I look forward to hearing what you have to say!

Terms and Conditions:
  1. To enter, leave a comment on this post offering feedback on the made by lolly 'Poppy Red' Collection 
  2. You may comment on the current collection or new items you wish to see or both
  3. Only one entry per person. Multiple comments will be deleted, and only the first comment accepted.
  4. Feedback is welcome at any time, but only comments received between now and 5pm on Monday 27th May 2013 will be accepted for the prize draw
  5. Each comment will be assigned a number, and a random number generator will be used to pick the winner 
  6. I reserve the right to delete comments and exclude from the prize draw any persons that leave comments that are excessively rude or contain spam content
  7. The winner will be announced via this blog during the evening of Monday 27th May 2013, and the prize of one Poppy Card with Badge + one Poppy badge will be posted free of charge to the winner within 1 week of receiving confirmed address details.


Wednesday 8 May 2013

How I inadvertently invented a marketing strategy...

Recently I have seen lots of blog posts and online magazine articles about the importance of marketing, and how getting to know your 'ideal customer' can help focus the direction in which your business is going.


I find reading these articles fascinating, as they are describing (in very helpful detail) a process I went through about a year ago.


...Only back then I didn't know I was creating a marketing strategy!


This is the story of how by finding my muse, I inadvertently created a marketing strategy that was the making of made by lolly!


When made by lolly first started back in 2010,  all I had was a hobby that had got out of hand.
I had no business plan, no branding and no idea where I was heading.

Two years pass. I teach myself how to blog, join Facebook and eventually Twitter too. I attend local craft fairs and set up online shops.  I learn how to take better product photos. I begin to develop a brand identity and focus on creating two new collections each year. I improve my packaging and display and hone my prices to achieve realistic profit.

I practice my craft and pride myself on the quality of the items I make.

But - there's a problem. I'm sitting at a craft fair in a cold damp hall, and the only potential customer that I've seen all morning is a soggy dog walker who has come in to get out of the rain. Even if she had remembered to bring her purse, (she hadn't) - this person was not my ideal customer.

That day made me realise that if my business (no longer an out-of-control hobby) was going to grow, I couldn't sit around hoping that a soggy dog walker would buy one of my felt accessories.

Think about it: How many times have you gone out to walk the dog and come home having bought a felt corsage?
Not many, I'm sure!

So, who was my ideal customer, and more importantly, where did she shop?
I used the rest of that unprofitable craft fair searching for my muse.

And I'm so glad I did, because although she is imaginary, and has no name, my muse (or 'ideal customer' if you prefer) has had more of an influence on the direction my business has taken than any other person!

Finding the Ideal Customer

These are the types of things I wanted to know:

  • Demographics: Gender, Age, Marital Status, Location, Education, Income
  • Personal Details: Height, Weight, Hair Colour, Personality, Style
  • Hobbies and Interests: Indoors or Outdoors?
  • Favourites: Book/Magazine/TV/Film/Music/Colour/Restaurant
  • Shopping Habits: Online or in person? Other brands?
  • Social Media Habits: Facebook/Twitter/Pinterest? 

But to be totally honest, for me the most revealing piece of information about my muse was working out which magazine she read. Isolating the elements of that particular brand and understanding where they were positioned in the market place, gave me a much clearer idea of where I was heading, and what I wanted to achieve. I worked out:

  • How trendy or traditional she was (from the styling and content)
  • How much disposable income she had (from the price of the magazine)
  • What kind of hobbies and interests she had (from the content)
  • Where she shopped and other brands she associated herself with (from the adverts)
  • What kind of product styling was in vogue (from the article photographs) 


Why was it so important to focus on a specific Ideal Customer? 


To persuade you how much easier things are with a muse, let me use this example:

When you are present shopping, which do you find easier:
Shopping for your best friend?
Or shopping for a distant relative who you see once or twice a year?

You know everything about your best friend.You know what colours and styles she wears, what she will like and dislike - and in fact you know her so well that you can anticipate how she will react when you show her something new.

Imagine that your 'ideal customer' is the best friend of your business.

How much easier would it be to make business decisions if you could already anticipate how your customers might react?

I have found that over the last year my muse has helped me make decisions on:

Colour Schemes | Pricing | Events | Product Display | Packaging | Social Media | 
Styling | Photography | Branding | New Products
 
 
To be totally honest - pretty much every area of my business! 
I now have a focus and an idea where my business is headed.
I have a marketing strategy and a business plan.
 
Plus I find my muse can be quite inspiring too. If I'm feeling stuck, I might put her favourite music on, or buy a copy of her favourite magazine to see if there are any new trends I should be aware of. Maybe I'll have a play on Polyvore and make her a new outfit (the high tech equivalent of those dress-up paper dolls I had when I was a child!)

Basically, I hang out with my imaginary friend! 

And do you know what?! It's the most rewarding and profitable relationship. Thanks to her my business is getting more exposure and I am making more sales. I have built a website. I have found the courage to apply - and get accepted - for bigger and more prestigious fairs.

But it is a bit of a one sided relationship - and sometimes I do feel 
like it's time I gave her something... 

 ...a name maybe?!

You can find the articles that inspired me to tell my story 
(as well as a lot more information!) by following these links:

 How to Find Your Target Market from the Etsy blog.

Positioning Yourself in the Market from Moyo Magazine, Issue 2 

your-one-most-awesome-customer from build a little biz
 
JUST FOR FUN... 
I'd love to know if you can guess what magazine my muse would read?
Or maybe you want to share something revealing about your Ideal Customer?

Please feel free to leave a comment below!


Thursday 2 May 2013

Salt Dough Experiments - Coloured Salt Dough

Last week I had my first ever experience of salt dough.

Hard to believe, but true!

I started off with a basic salt dough recipe and some basic tools and equipment. The results were varied to say the least, but I didn't allow the lack of instant success to put me off!

According to my extensive research there are many different ways to vary the colour, texture and decoration of your salt dough ornaments - including oil, lemon juice, wallpaper paste, tea, coffee, paint, lace, stamps, buttons...


I haven't had time to try them all, but here are some of the results from my salt dough experiments:

How to make salt dough easier to handle
  • Add a few drops of vegetable oil to the basic salt dough recipe This will help make the dough soft and silky, and easier to knead    
  • Try not to add too much water. The salt dough should be soft and pliable, but never sticky otherwise it will be difficult to handle
  • Make sure you knead the salt dough for at least 5 minutes. The softer and smoother that your basic salt dough is, the better your finished items will look!
  • As I was making small and delicate items, I found it easier to work with only 1/4 of the dough at a time. Store the leftover salt dough under a damp cloth until you need it.
  • I covered my work surface with greaseproof paper to make it easier to move the dough after rolling out

Using coffee to make coloured salt dough

  • Add some coffee granules to a small lump of salt dough. Knead and manipulate the dough until the coffee granules have all blended into the dough (1.)
  • If you want a mottled effect, press more coffee granules into the surface of the salt dough (2.)
  • If you want a marbled effect, manipulate the dough until the coffee granules have only partially blended in (3.)
  • If you want a darker, solid colour, add much more coffee and knead very well to ensure the colour is evenly spread throughout the dough (4.)

Using acrylic paint to make coloured salt dough

  • Add some acrylic paint to a small lump of salt dough. Knead and manipulate the dough until the paint has blended in (1.) (You may want to wear gloves and protect your work surface during this stage as it can get messy until the paint has all mixed in!)
  • If you want a marbled effect, manipulate the dough until the paint has only partially blended in (2.)
  • If you want to add extra colour and texture, why not try adding some coffee granules to the coloured salt dough (3.)
  • Once rolled out the combination of the marbled paint and the coffee granules gives an amazing effect! (4.) 
I'm amazed by the results that can be achieved just by adding a few simple things to the basic dough - and somehow, I think that there may be many more things I have yet to discover about salt dough!

I'd love to know if you have any salt dough recipe recommendations, or any ideas for future projects...

Please feel free to leave a comment below - and who knows, 
it may inspire me to write a blog post about it!

Friday 26 April 2013

How to Make Salt Dough - Basic Salt Dough Recipe

I'm just gonna say it.

Up until 2 weeks ago, I'd never made salt dough before. Hard to believe, right?

I can hear you asking...

"...Surely you had your first experience of salt dough was at pre-school, making jolly Christmas ornaments"
"...Maybe it was a rainy day activity that you tried with your younger brother?"
"...Well then, you must have made heart shaped wedding favours with your girlfriends?"

Nope! Not me.

A week last Sunday I found myself with an empty sewing basket, a tidy(ish) work room and some creative time to kill. I'd found a salt dough tutorial (by The Cheese Thief) that had been pinned on Pinterest (See the original tutorial here) and thought to myself.... I could do that!

And it turns out that salt dough is very easy to make, very cheap to make, and great fun!

So in case there is anyone out there that has never made salt dough ornaments before, here is the very basic salt dough recipe:

1 cup flour | 1/2 cup salt | 1/2 cup warm water

Mix everything together in a bowl

Knead the dough for at least 5 minutes to ensure all ingredients
are well mixed. 

You are aiming to end up with a dough that is soft and pliable, but not sticky. The longer that you work the dough, the easier it is to 
handle and the smoother the end result will be

PLAY!

Try using cookie cutters, stamps, inks... 
Why not try moulding the dough into 3D shapes?

Once you have finished, place your pieces on some greaseproof/waxed paper and allow to air dry for at least 3 days.

BE PATIENT! Try REALLY hard not to keep touching them and picking them up during this time. Salt dough can become brittle, 
and the more that you handle it as it drys, the more likely it is to snap.

Once your pieces are completely dry, (and this may take longer than 3 days....) you can smooth the surface with an emery board or some fine sandpaper, before varnishing them.


That was the basic salt dough recipe.

Perfect if you want simplistic and rustic salt dough ornaments. But what happens if you want something more sophisticated? Or want to add colour or decoration to your salt dough?

According to my extensive research (my thanks to Pinterest and Google!) there are many different ways to vary the colour, texture and decoration of your salt dough ornaments. Oil, lemon juice, wallpaper paste, tea, coffee, paint, lace, stamps, buttons...

There are so many salt dough variations waiting to be explored!

Check out my next blog post to see the results of my adventures with salt dough variations

OR...
maybe you might find some inspiration on my Pinterest board:


Friday 19 April 2013

Feedback Friday

Welcome to my first ever Feedback Friday!

Working for yourself can often be great - you can listen to whatever music you want, stop for a brew whenever you want... and more importantly you can design and make whatever you want!

But although this creative freedom can be very liberating, I still need to make a profit from selling the items that I design and make - so finding out what people want is very important.

However - it's not always easy to second guess what my customers might like to buy. So instead of guessing, I thought it might be a good idea to just ask!

And so here it is. 
 
'Feedback Friday' 

My chance to ask you what you think of one of my new plans, projects or products
Your chance to feedback what you really think!


Feedback Friday 19/04/2013
Potential New Product: Pin Badges


Based on my most popular designs
Sold in packs of 4 for £3.50
Manufactured in the UK

Do you think they would sell?
Would you buy them?
What designs would you like to see? 
Do you mind that they would not be handmade by me?

I'd really love to know what you think! 
Give me your feedback...

Please leave a comment below 
OR

Thank you!

Wednesday 3 April 2013

What's On in Sheffield this weekend?

Well... since you ask...

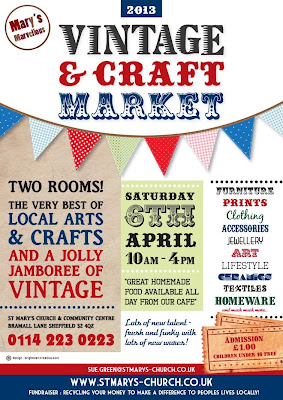
...It's Mary's Marvellous Vintage and Craft Market!

This craft and vintage fair, based at St Mary's Church on Bramall Lane, is one of my favorite events to visit, as a seller AND a customer.

There is always a great atmosphere, the food is delicious and the eclectic mix of retro, vintage and quality craft means that it is very hard to leave the building without treating yourself to something!

This particular fair is important to me as it will be made by lolly's first outing of the season -  with the new Spring Collection of felt accesories making their 'real-life' debut.

As you may know I have been busy extending the range to include felt keyring/bag charms, hair accessories and craft kits which will co-ordinate with the badges, brooches and corsages I currently sell.

I am really looking forward to getting feedback from both old and new customers - so if you are in the area on Saturday 6th April pop in and say hello! 

As the poster says - you will see: 
'the very best of local arts and crafts and a jolly jamboree of vintage!'


Sunday 24 March 2013

New Product: Craft Kit - Felt Flower Pin Brooch

The new products are arriving thick and fast this Spring...

...and the latest item to be added to the made by lolly collection of felt accessories is a do-it-yourself

Felt Flower Pin Brooch Kit.


If you have always fancied having a go at making your own made by lolly style 
retro felt flower pin brooch... now you can!

Cleverly packaged inside the recycled kraft card envelope you will find pre-cut felt pieces, contrasting thread, a polka dot button and a brooch pin - all you have to do is find a needle and you will have everything you need to create your own handmade felt accessory.

There's no need to worry if your sewing skills are a little rusty - the kit is suitable for anyone ages 10+ and the illustrated instructions mean that it's easy enough for even a novice to complete.

And if you are thinking of giving the kit as a gift, the square packaging will make wrapping easy - and as they are so flat they can be posted for the cost of a Large 1st Class stamp!

The Hot Pink version of the Felt Flower Pin Brooch Craft Kit can be purchased now from my online shop along with many other items from the made by lolly Spring Collection.


Saturday 16 March 2013

What's New - Spring 2013

It seems a little ironic that in my last post 'A Sunny Weekend in Yorkshire' I was expostulating the need to take time off, to give yourself a break and to creatively re-charge the batteries...

Ironic, as that post was written back in November October (!) and since then I have been so busy I haven't even had time to blog!

So, what have I been up to?

Well, there's been Christmas Craft Fairs, New Stockists, Application Deadlines, Business Plans, Product Photography, Custom Orders... oh - and being made redundant from the day-job!

BUT... the biggest bit of news is that the made by lolly Spring/Summer 2013 Collection of felt accessories is now available from my online shop! This season's colour collection utilises Hot Pink, Lime Green, Soft Grey and Cooling Cream, and features some designs you may recognise - like the ever popular Blooming Petals....


As well as new brooch designs and colour combinations, like this Retro Ripple Corsage...


And.... New Product Lines too! 


I have recently introduced these layered retro style Felt Flower Hairbands and Keyrings
so now when I say that I design and make 'colour themed collections of felt accessories'
I can really mean it!

And that's just a small taster of the new range! Thanks for being patient in my absence  - I hope you feel the wait has been worth it! I also hope that now I have made contact again you'll be happy to stick around as there's so much more to come from made by lolly this year.

I'll be popping back soon with more updates, but if you really want to keep on top of what's happening in my wonderful world of felt accessories you will find I am regularly available on Twitter, Facebook and Pinterest (It really is a wonder that I get any work done, ever!)

If however, you are far to sensible to waste your time getting caught up in all the social networks and would prefer to hear my news in one handy monthly mail out, then enter your email address in the box below and you will be added to the mailing list for the made by lolly newsletter!


That's all from me for now! See you again soon!
Laura x

Related Posts Plugin for WordPress, Blogger...